
aws
Serverless computing on AWS #5 Hosting your website (Part 2)
by Stuartpublished onI prefer to host my web sites via CloudFront, there are a few reasons for this:
- CloudFront is distributed; it hosts content close to your clients, using a global network of "edge locations"
- CloudFront is a Content Delivery Network (CDN). It will cache content close to your clients.
- When hosting on a custom domain: CloudFront provides HTTP and HTTPS, S3 Web Hosting is limited to HTTP
- Your S3 buckets are hidden from the Internet
Hosting via CloudFront will be more expensive than simple S3 but that's only an issue if you have a high traffic site: that would be a good problem to have!
As before I'll assume you have a domain name for your website. If not you can get a domain name from AWS Route 53.
Use AWS S3 and Cloudfront to host your website
Step 1
Create an S3 bucket for your website - give it the same name as your new domain, choose a region close to you and press "Create":
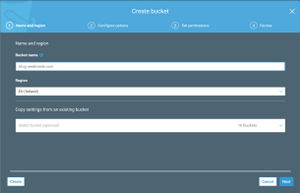
This time we're going to keep our bucket private, we're not going to enable web hosting.
Step 2
Create an index.html file and an error.html file and upload them into your bucket.
Step 3
Go to Cloudfront service and create a CloudFront Distribution. Choose "Web" when asked.
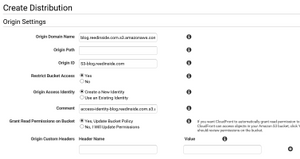
- Origin domain name: select your S3 bucket
- Restrict Bucket Access: Yes
- Origin Access Identity: Create a new identity
- Grant Read Permissions on Bucket: Yes, Update Bucket Policy
- Go with the defaults for all other fields
When complete you should see that your new Cloudfront Distribution deployment status is "in progress". This step will take several minutes to complete.
Step 4
Once the deployment is complete you should be able to navigate straight to your website, using Cloudfront's domain:

In my case: https://d14r9oqdar09ng.cloudfront.net/index.html
Step 5
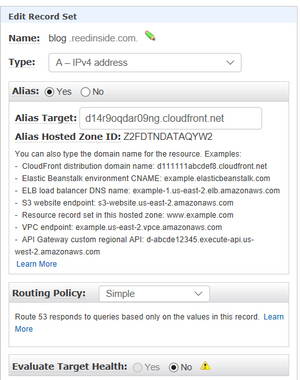
Now let's map our domain to Cloudfront.
Copy the domain name from above, in our case d14r9oqdar09ng.cloudfront.net
Launch Route 53, select your domain and create a record set, I chose "blog":
Step 6
Edit your CloudFront distribution:
- Add "Alternative Names for domain": (in our case) "blog.reedinside.com"
- Add "Default Root Object": "index.html"
Now you should be able to navigate to your website using http on your own domain, in our case: http://blog.reedinside.com
If you attempt to browse in https you'll get a certificate error - we'll look at that next.
Step 7
Navigate to the Certificate Manager service.
- Very important: change your region to US East (N. Virginia)
- Request a certificate
- Request a public certificate
- Add your domain name. In our case blog.reedinside.com (you could also create a wildcard certificate by entering *.reedinside.com - valid for all subdomains)
- Select DNS validation
- Confirm and request
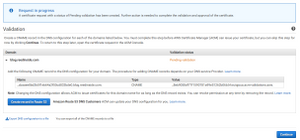
- Press: "Create record in Route 53" (this is an advantage of using Route 53 for domain management)
- Wait for up to 30 minutes for your domain to be verified and for the certificate to be issued.
Step 8
When your certificate has been issued, head back to CloudFront and edit your distribution.
SSL Certificate: choose "Custom SSL Certificate (example.com)"
Select your new certificate from the list:

Now you should be able to browse to your website using https protocol:
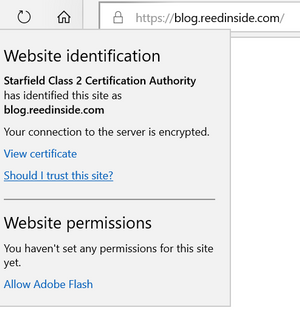
Step 9
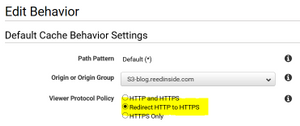
If you'd like to limit access to your website to https protocol, you can modify the behaviour in the Cloudfront distribution:
- Select "Behaviour" from CloudFront distribution and Edit it
- Change Viewer Protocol Policy:
You're done! You now have a website that is secure, fast and scalable.
Comments